
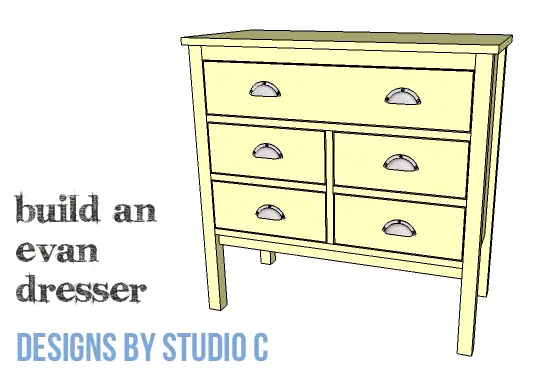
DIY Furniture Plans to Build an Evan Dresser
A Super-Simple Dresser to Build
I love this little dresser – especially since it can be finished in so many ways! The DIY furniture plans to build an Evan Dresser feature one long drawer at the top with four shorter drawers underneath. This is an easy and inexpensive build that can be completed in a weekend!
Materials:
- 1-1/4″ pocket hole screws
- 1-3/4″ brad nails
- Edge banding
- 5 sets of 12″ ball-bearing drawer slides (<– affiliate link!)
- Cabinet pulls
- Wood glue
- Sandpaper (100, 150, 220 grits)
- Finishing supplies (primer & paint, or stain, sealer)
Tools Needed:
- Table saw
- Miter saw or circular saw
- Iron for edge banding
- Drill
- Pocket hole jig
- Right angle drill attachment (for tight spaces)
- Pneumatic brad nailer with compressor
- Sander
- Drawer slide jig (optional)
Lumber:
- 1 – 1×2 at 6′
- 7 – 1×6 at 8′
- 2 – 2×2 at 6′
- 1 – 4′ x 4′ sheet of 1/4″ plywood
- 1 – 4′ x 8′ at 3/4″ plywood
Cut List:
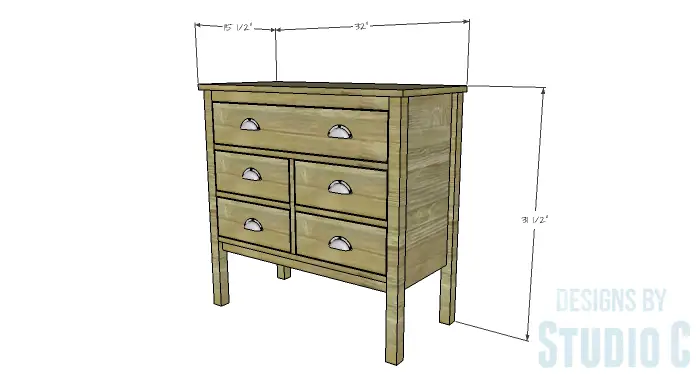
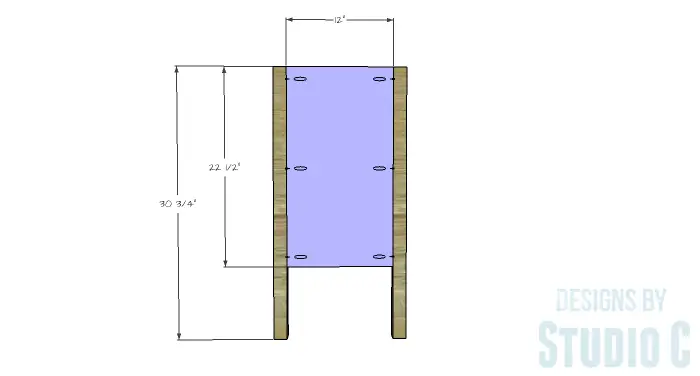
- 4 – 2×2 at 30-3/4″ – Legs
- 2 – 3/4″ plywood at 12″ x 22-1/2″ – Side Panels
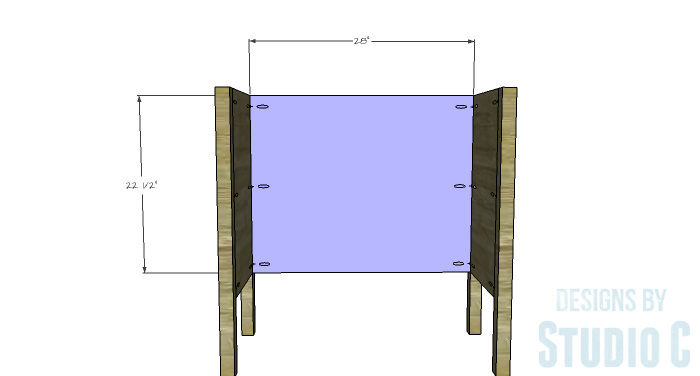
- 1 – 3/4″ plywood at 22-1/2″ x 28″ – Back
- 2 – 1×2 at 28″ – Upper & Lower Stretchers
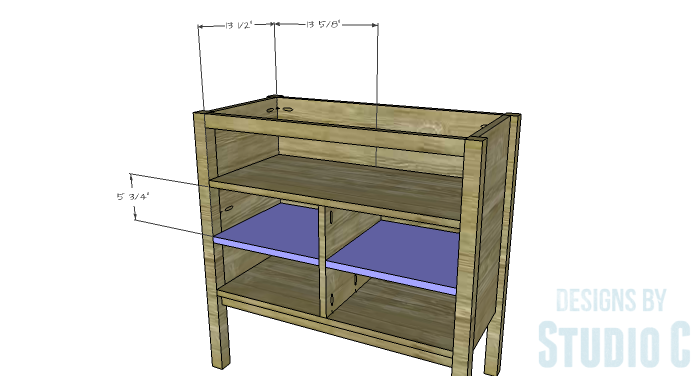
- 2 – 3/4″ plywood at 13-1/2″ x 28″ – Shelves
- 1 – 3/4″ plywood at 12-1/4″ x 13-1/2″ – Divider
- 2 – 3/4″ plywood at 13-1/2″ x 13-5/8″ – Lower Drawer Dividers
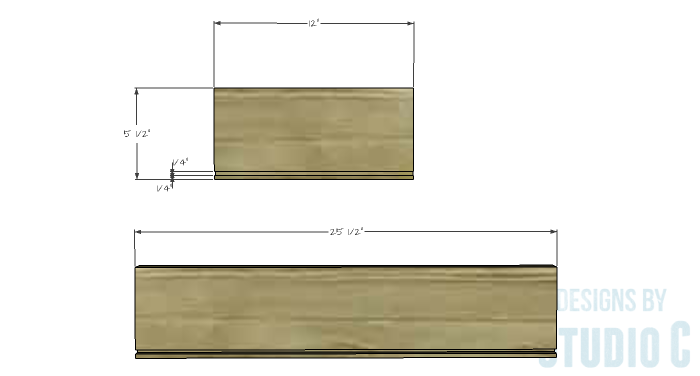
- 2 – 1×6 at 12″ – Large Drawer Box Sides
- 2 – 1×6 at 25-1/2″ – Large Drawer Box Front & Back
- 1 – 1/4″ plywood at 11″ x 26″ – Large Drawer Box Bottom
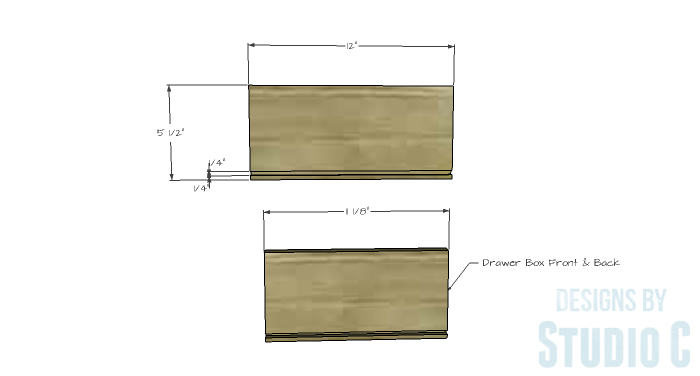
- 8 – 1×6 at 12″ – Small Drawer Box Sides
- 8 – 1×6 at 11-1/8″ – Small Drawer Box Front & Back
- 4 – 1/4″ plywood at 11″ x 11-5/8″ – Small Drawer Box Bottom
- 1 – 1×6 at 27-3/4″ – Large Drawer Front
- 4 – 1×6 at 13-3/8″ – Small Drawer Fronts
Step One
Cut the pieces for the legs and the side panels. With the pocket hole jig set for 3/4″ material, drill pocket holes along each long edge of the side panels. Secure the panels to the legs using glue and 1-1/4″ pocket hole screws. The back face of the side panels will be flush with the inside faces of the legs.
Step Two
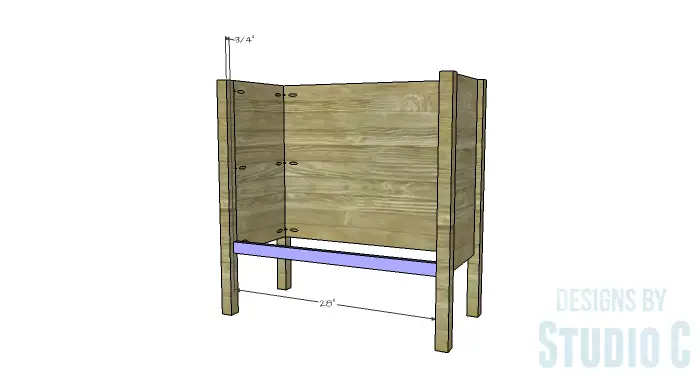
Cut the piece for the back and drill pocket holes along the side edges. Secure the back panel to the legs using glue and 1-1/4″ pocket hole screws. The back face of the panel will be flush with the inside faces of the legs.
Step Three
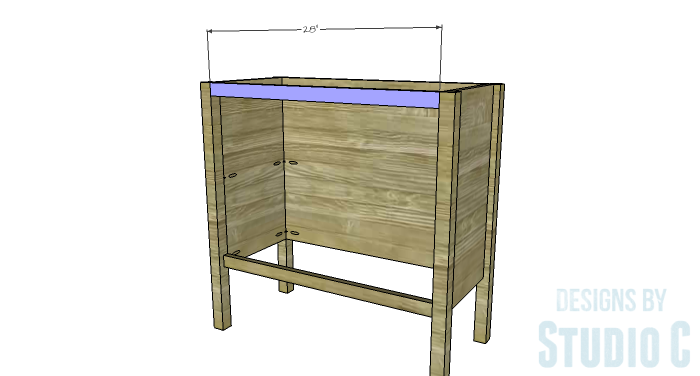
Cut the pieces for the upper and lower stretchers, and drill pocket holes in each end. Secure the lower stretcher to the legs as shown (located 3/4″ back from the front face of the legs) using glue and 1-1/4″ pocket hole screws.
Secure the upper stretcher to the legs in the same manner – the front face of the upper stretcher will be flush with the front faces of the legs.
Step Four
Cut the pieces for the shelves. Drill pocket holes in the side and back edges. Secure the shelves to the sides and back using glue and 1-1/4″ pocket hole screws. The lower shelf will be positioned on top of the lower stretcher – add a few 1-3/4″ brad nails through the shelf into the stretcher for further security.
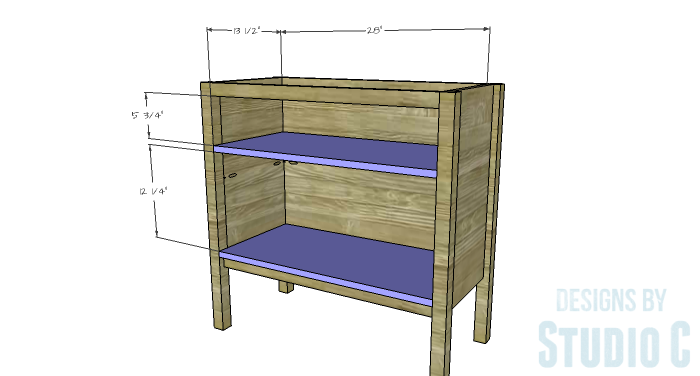
Step Five
Cut the piece for the divider, drilling pocket holes in the top and bottom edges as well as the back edge. Secure the divider to the shelves and back using glue and 1-1/4″ pocket hole screws.
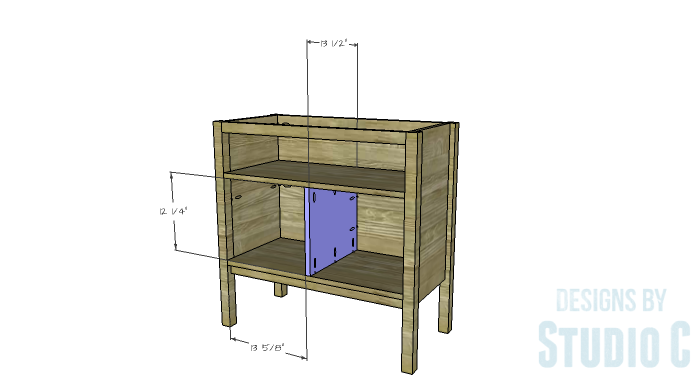
Step Six
Cut the pieces for the lower drawer dividers, drilling pocket holes in the side and back edges. Secure the drawer dividers to the sides and center divider using glue and 1-1/4″ pocket hole screws.
Step Seven
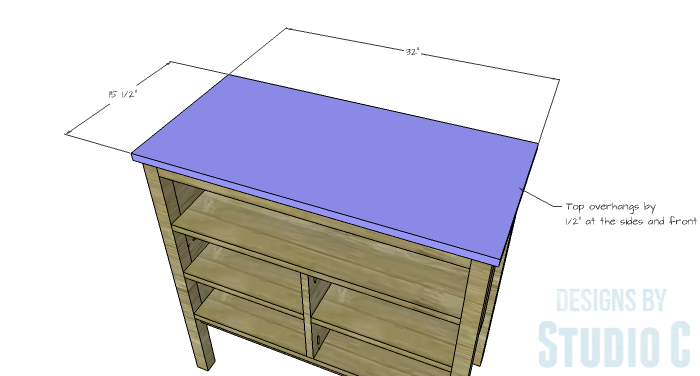
Cut the piece for the top. Apply edge banding to all edge of the top prior to securing it to the cabinet. The sides and front of the top will overhang by 1/2″.Secure in place using glue and 1-3/4″ brad nails through the top into the legs, side panels, back and upper front stretcher.
Step Eight
For both sizes of drawers:
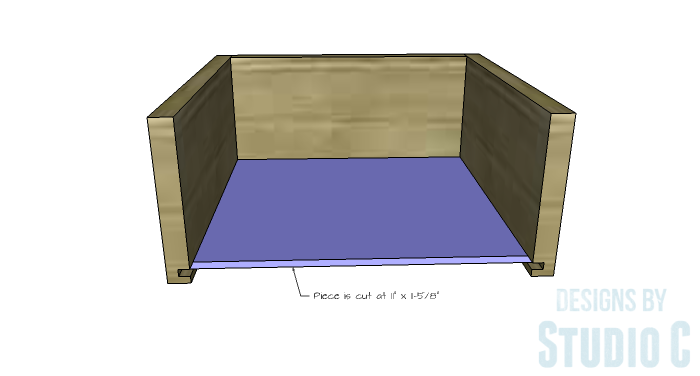
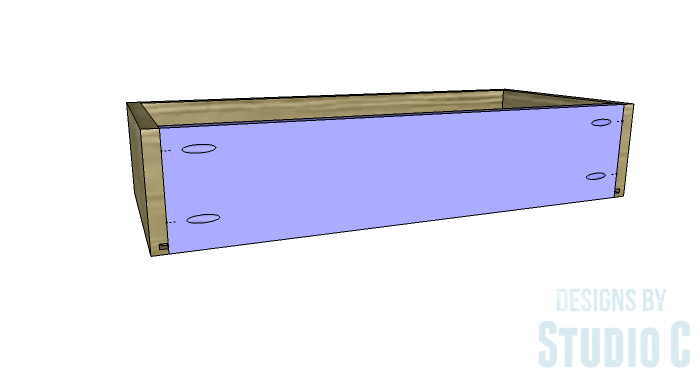
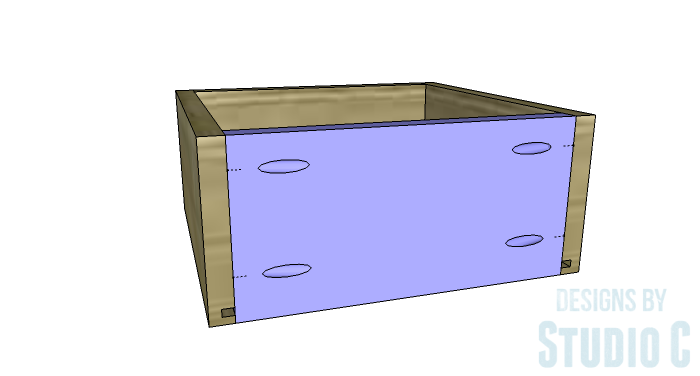
Cut the pieces for the drawer box sides, front, and back. Cut the groove in the bottom edge of each piece at 1/4″ wide by 1/4″ deep using a table saw or a router and a straight bit. Set the pocket hole jig for 3/4″ material and drill pocket holes in each end of the drawer box front and back pieces on the opposite side as the groove. Make sure that the pocket holes will not interfere with the groove. Secure the sides to the back using glue and 1-1/4″ pocket hole screws.
Step Nine
Cut the piece for the drawer bottom. Slide the bottom into the grooves in the sides and back. The piece should fit snugly but not too tight.

Step Ten
Insert the front edge of the drawer box bottom into the groove on the drawer box front. Secure the drawer box front to the drawer box sides using glue and 1-1/4″ pocket hole screws. Install the drawer slides according to the manufacturer’s installation instructions locating them ¾” back from the front edge of the legs. Here’s a great tutorial on installing drawer slides that will be very helpful!
Step Eleven
For both drawer front sizes:
Cut the pieces for the drawer fronts. Mark the position for the drawer pulls and drill the holes. Shim the drawer front in the opening – there will be a 1/8” gap around all sides – then drive screws through the holes for the drawer pulls into the drawer box. Open the drawer, and secure the drawer front using countersunk 1-1/4” screws from the inside. Remove the screws from the holes for the drawer pull then finish drilling the holes. Install the drawer pull. This tutorial on installing drawer fronts should be quite helpful!

Finish as desired.
This dresser is perfect for a child’s room (properly secured to the wall, of course!) as well as an adult’s room. It can also be used as storage in an entryway or dining room. Have any questions about the DIY furniture plans to build an Evan Dresser? Leave a comment below!
Originally posted 2016-02-03 08:00:12.
Would these plans still work if I nailed the bottom of the drawer to the sides vs doing the 1/4 dado construction?
Hi, Brittany! For this plan, no it would not because it would add 1/4″ to the overall height of the drawer boxes and they would fit too tightly in the opening. The 1×6 material for the drawer boxes could either be ripped down to 5-1/4″ on a table saw or swapped out for 1×4 material. If using 1x4s and adding a 1/4″ bottom the drawer height would then be 3-3/4″ which will leave plenty of room in the opening. It would be a good idea to assemble the drawer box first (the front, back and sides) then measure and cut the bottom! Hope this helps! 🙂
[…] this five drawer dresser using these free step-by-step woodworking […]