
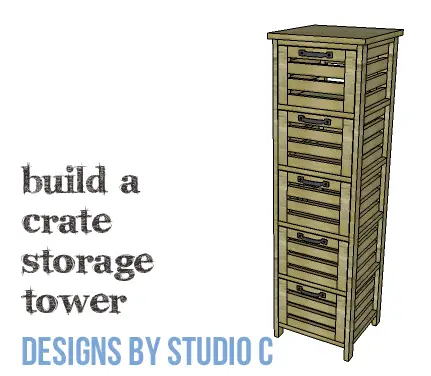
Build a Crate Storage Tower
A Small Storage Tower Perfect for Any Room
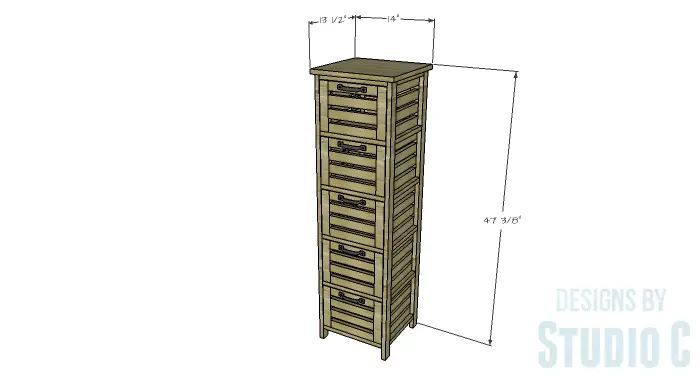
This storage tower is a very easy build and can be built using reclaimed or scrap wood! The DIY furniture plans to build a Crate Storage Tower feature five crates in their very own vertical tower with no drawer slides to install! This fabulous tower can be completed over a weekend! Casters with square plates can also be added to the bottom of the legs for portability.
Materials:
- 1-1/4″ pocket hole screws (<– affiliate link!)
- 1-1/2″ brad nails
- 1-3/4″ brad nails
- Edge banding (<– affiliate link!)
- Cabinet pulls
- Wood glue
- Sandpaper (100, 150, 220 grits)
- Finishing supplies (primer & paint, or stain, sealer)
Tools Needed:
- Miter Saw or Circular Saw
- Drill
- Pocket Hole Jig
- Iron & Cutter for Edge Banding
- Pneumatic Brad Nailer with Compressor
- Sander
Lumber:
- 16 – 1×2 at 8′
- 1 – 2′ x 4′ sheet of 3/4″ plywood
Cut List:
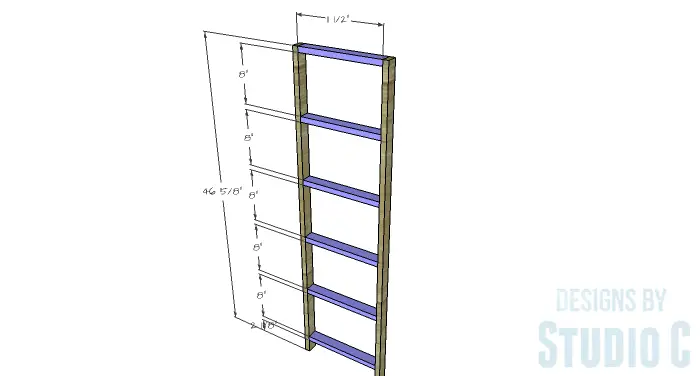
- 4 – 1×2 at 46-5/8″ – Tower Legs
- 12 – 1×2 at 11-1/2″ – Tower Front & Back Framing
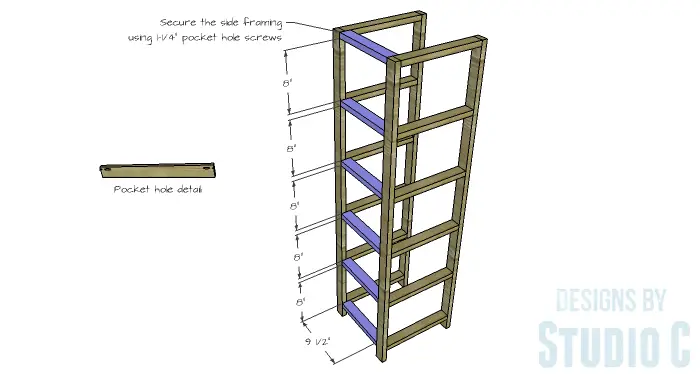
- 12 – 1×2 at 9-1/2″ – Tower Side Framing
- 1 – 3/4″ plywood at 13-1/2″ x 14″ – Tower Top
- 20 – 1×2 at 7-15/16″ – Crate Front & Back
- 40 – 1×2 at 8-3/8″ – Crate Front & Back
- 40 – 1×2 at 10-1/2″ – Crate Sides
- 5 – 3/4″ plywood at 9-7/8″ x 10-1/2″ – Bottom
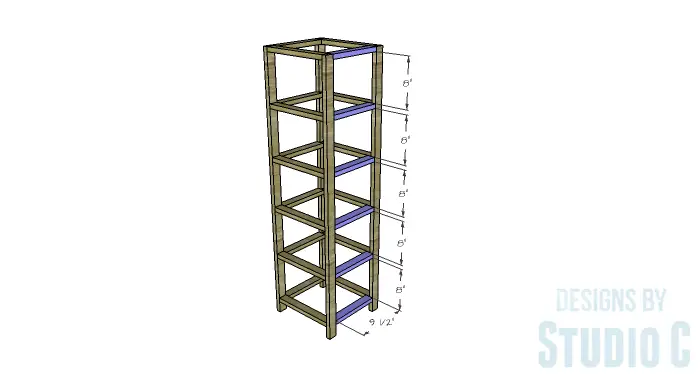
Step One
Cut the pieces for the tower legs, and the front, back and side framing. With the pocket hole jig set for 3/4″ material, drill pocket holes in each end of the front and back framing pieces. Secure the framing pieces to the legs as shown (there will be two assemblies) using glue and 1-1/4″ pocket hole screws.
Step Two
For the side framing, there will only be one pocket hole drilled in each end. This pocket hole will be offset so that it can attach to the legs (see detail). The outside edge of the side framing will be flush with the outside face of the legs. This will provide a surface to support the crates. Secure the side framing using glue and 1-1/4″ pocket hole screws.
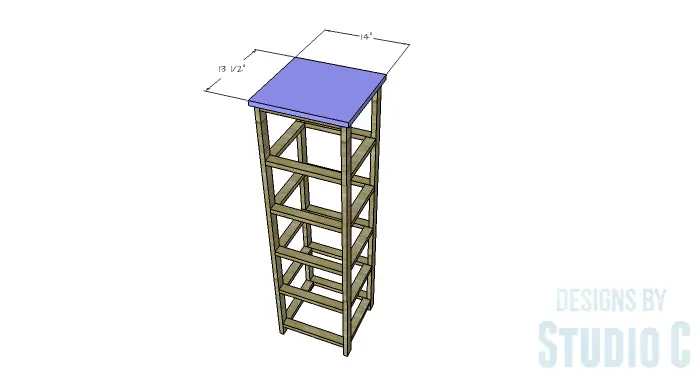
Step Three
Cut the piece for the top. Edge banding will be applied to the exposed edges prior to assembly. The top will overhang the framing by 1/2″ on all sides. Secure the top using glue and 1-3/4″ brad nails.
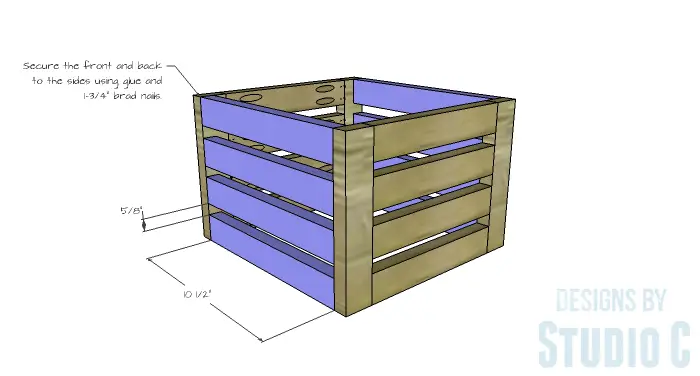
Step Four
Cut the pieces for the front and back of the crates. Drill pocket holes in the front and back horizontal pieces as shown. Secure the horizontal pieces to the vertical pieces using glue and 1-1/4″ pocket hole screws spacing the pieces approximately 5/8″ apart.

Step Five
Cut the pieces for the crate sides. Secure the front and back assemblies to the sides using glue and 1-3/4″ brad nails.
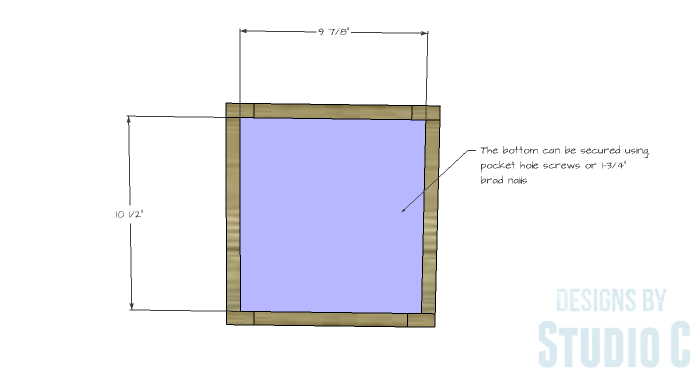
Step Six
Cut the pieces for the bottom. The bottom can be attached using pocket holes (with pocket holes drilled in all four edges) or with 1-3/4″ brad nails. With either joinery method, be sure to use glue!
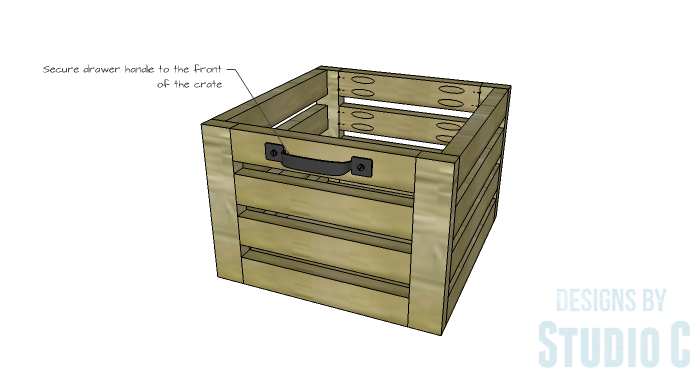
Finish as desired, then install the cabinet pulls to the front of each of the crates.
This tower is the perfect addition to a craft room, to house small tools and supplies, or to hold books and toys belonging to the kiddos! Have any questions regarding the DIY furniture plans to build a Crate Storage Tower? Leave a comment below!
Originally posted 2016-04-19 08:00:24.
[…] a storage tower plus crates using these free woodworking plans. Baskets are another […]
[…] Small Storage Tower […]