
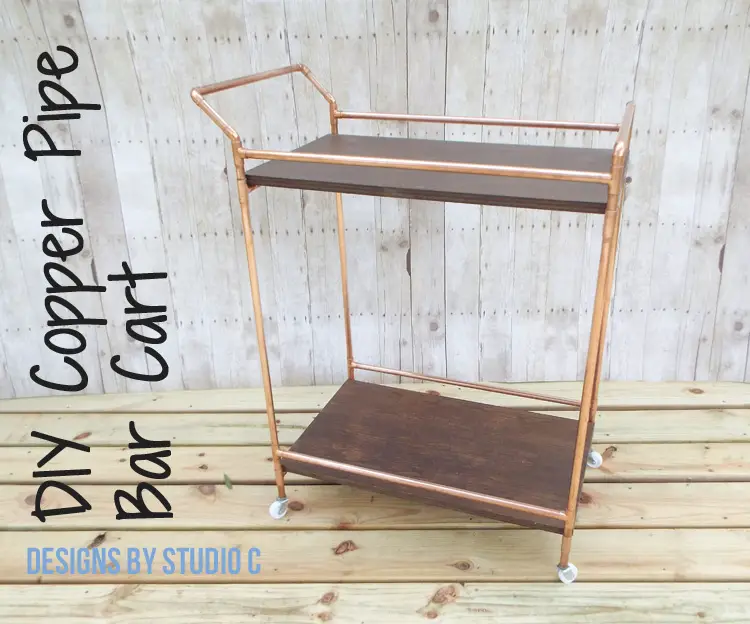
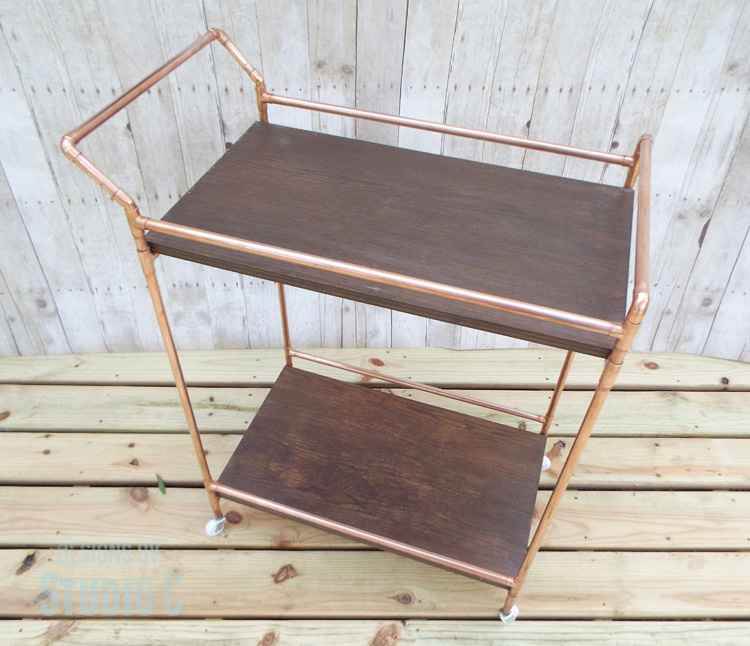
DIY Copper Pipe Bar Cart with Wood Shelves
A Beautiful Bar Cart Perfect for Entertaining!
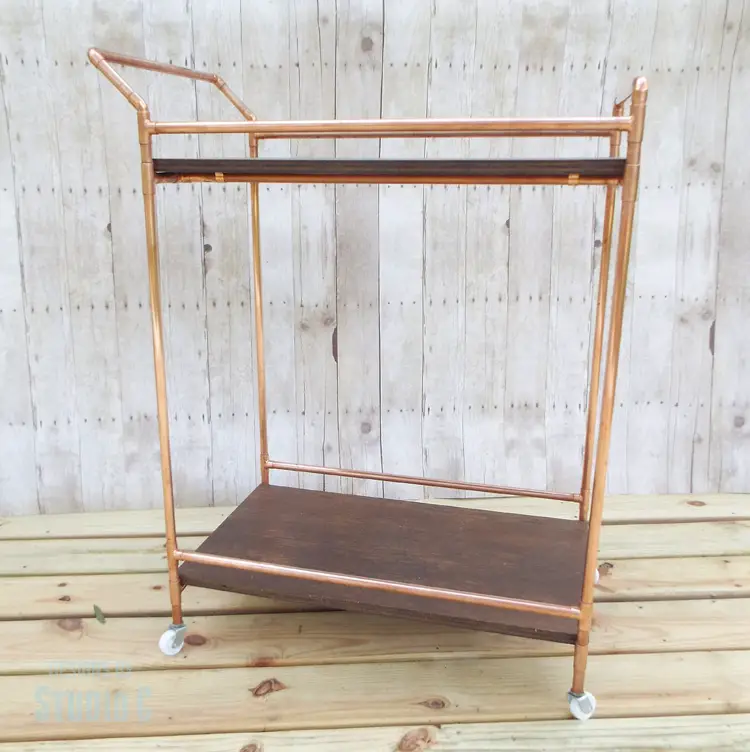
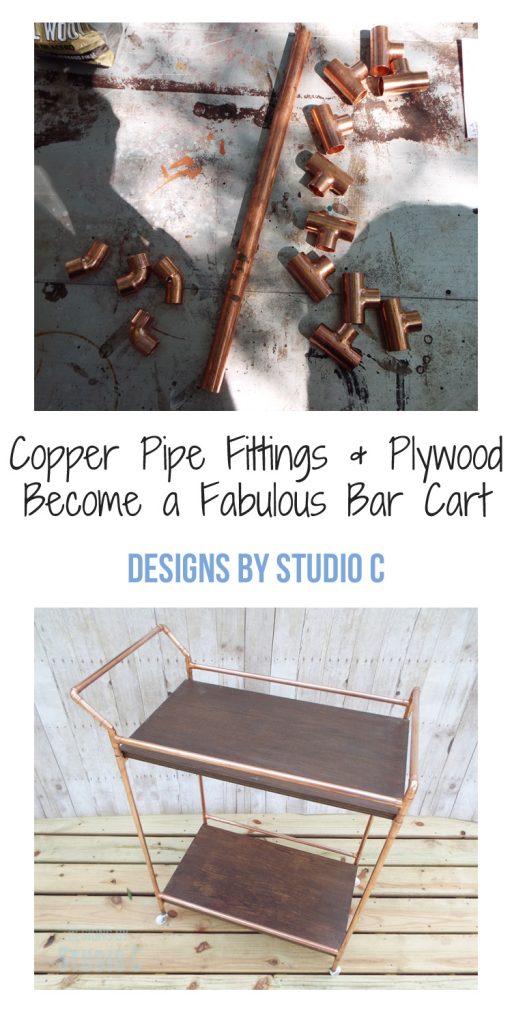
I absolutely adore copper pipe! Even though it can be a bit pricey, it’s incredibly simple to work with and allows you to craft some truly breathtaking projects. Take, for example, this DIY copper pipe bar cart. It cleverly incorporates copper pipe and fittings for the frame, along with two lovely wooden shelves. The best part? This cart is equipped with casters, making it effortlessly portable and convenient to move around whenever necessary. Trust me, this cart is an absolute gem for hosting and entertaining all kinds of dinner parties!
Supplies:
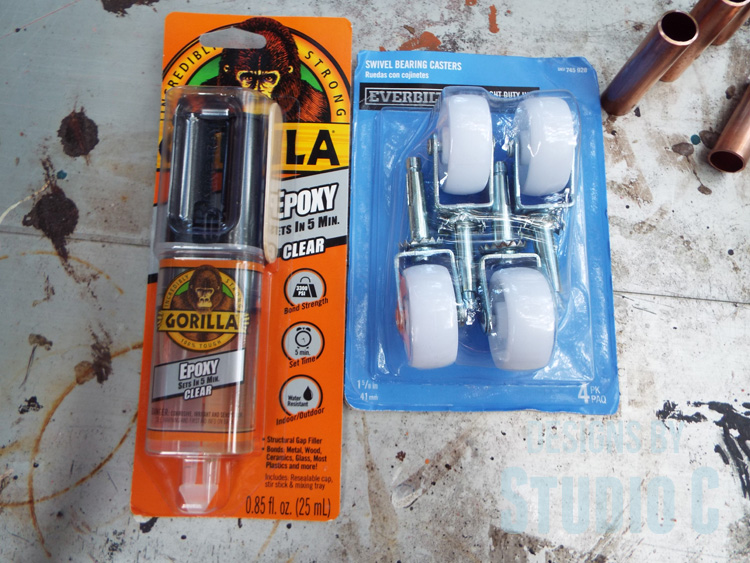
- Strong, fast drying adhesive (such as DAP® Weldwood Instant Adhesive)
- Epoxy (I used Gorilla Glue epoxy)
- 3 – 1/2″ copper pipe at 10′
- 1 – 1/2″ copper pipe at 5′
- 24 – copper tee fittings
- 4 – 90° copper elbows
- 2 – 45° copper elbows
- 2 – 2′ x 4′ sheets of 3/4″ plywood
- 4 – copper pipe straps
- 8 – 3/4″ screws
- 4 – 2″ casters with sleeves
Tools needed:
Cut List:
Pieces of copper pipe:
- 4 @ 2″ – Caster Legs
- 8 @ 3-1/4″ – Ends Under Shelves
- 4 @ 7-1/4″ – Ends Under Shelves
- 8 @ 25″ – Sides, Support Pieces for Shelves
- 8 @ 2″ – Side Rail Spacers
- 4 @ 22-3/4″ – Legs
- 2 @ 1-1/8″ – Handle Connector
- 2 @ 3-1/2″ – Handle
- 1 @ 15-1/2″ – Handle
- 2 @ 1-1/8″ – End Bar Sides
- 1 – @ 15-1/2″ – End Bar
Shelves:
- 2 – 3/4″ plywood at 15-1/4″ x 26-1/4″
Notes about the project:
Measure the opening for shelves before cutting the plywood. Variations in the cuts of the pipe can affect this measurement but not by much!
Refer to the photos for the orientation of the tees. Use the fast drying adhesive to secure the pipe to the fittings.
Step One
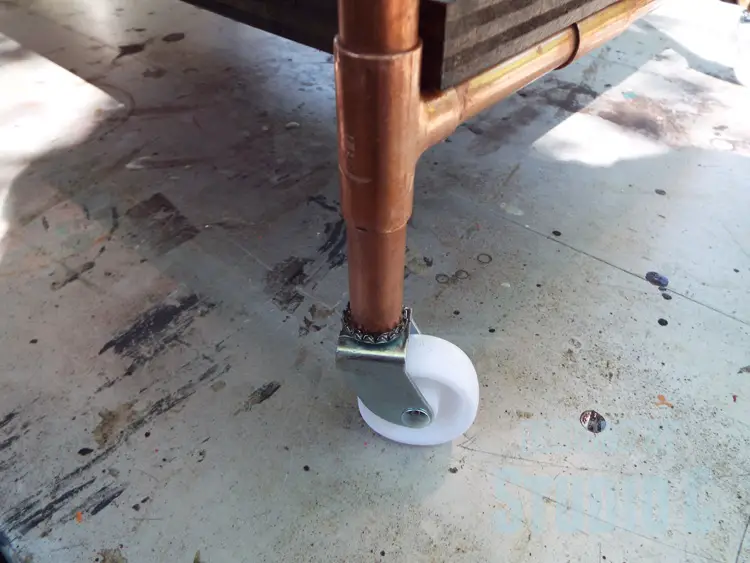
Cut the pieces for the caster legs. Use the epoxy the secure the caster sleeve in one end of each piece of pipe making sure the each end of the sleeves are clear to allow for the caster post. Set the pieces aside to let the epoxy cure.
Step Two
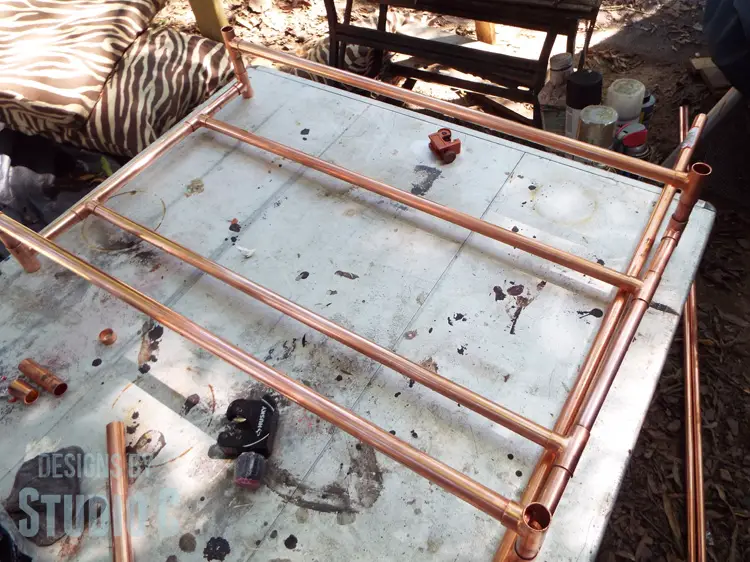
Cut the pieces for the ends that will go under the shelves. Secure the 3-1/4″ pieces of pipe to the end of a tee. Assemble the sides with a 7-1/4″ piece of pipe between the tees.
Step Three
Add a tee to each end of the ends that will go under the shelves, orienting them as shown in the photo. Insert a 2″ piece of pipe in one end of these tees, with a tee at the other end. There will be four of these assemblies – two for the bottom shelf and two for the top shelf.

Step Four
Use the 25″ pieces of pipe to connect the end assemblies to each other. There will now be two assemblies. Set one off to the side, then place the other on a flat surface. Insert the legs as shown, then position the second assembly on top.
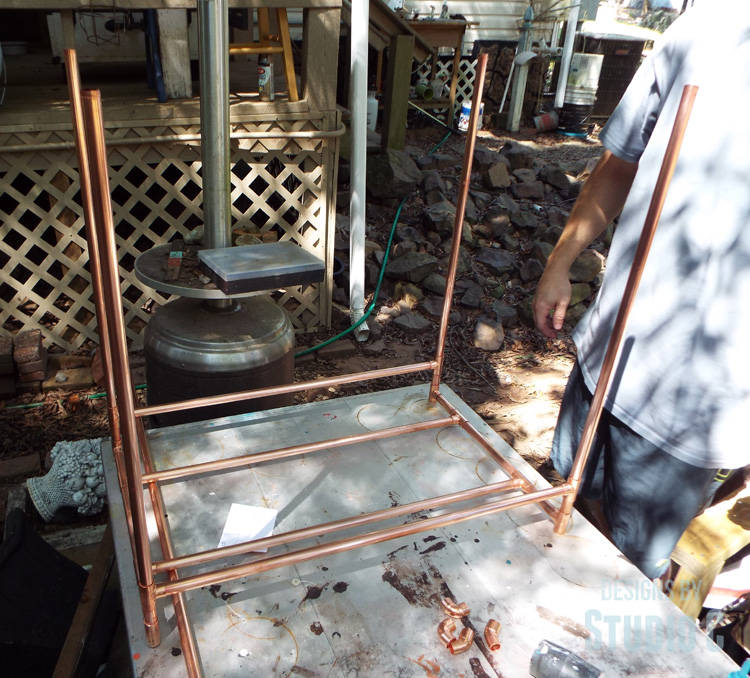
Step Five
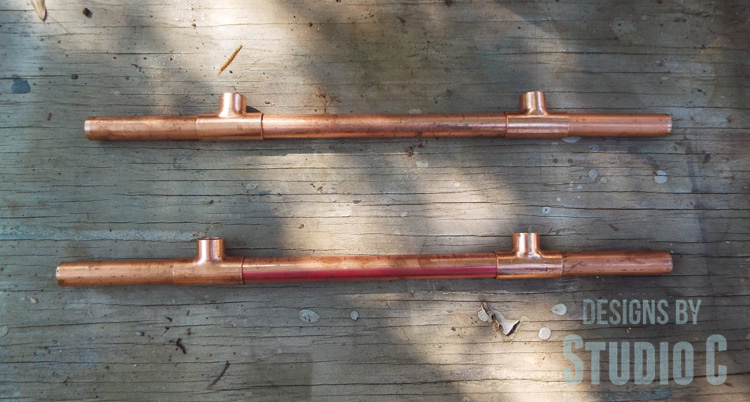
To create the handle, insert the 3-1/2″ pieces of pipe into a 90° elbow with a 15-1/2″ piece of pipe in between. Insert a 1-1/8″ piece of pipe into the tees on the top of the upper shelf with a 45° elbow on top pointing away from the cart. Insert the handle assembly into the 45° elbows.
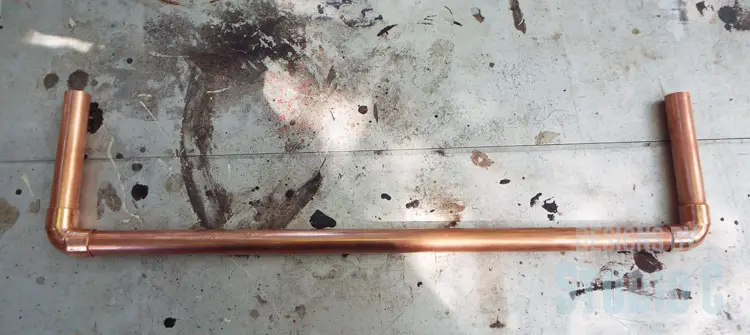
Step Six
Insert a 1-1/8″ piece of pipe into the ends of the remaining 90° elbows with a 15-1/2″ piece of pipe in the center. Insert the ends of the pipe into the tees on the side opposite the handle.
Step Seven
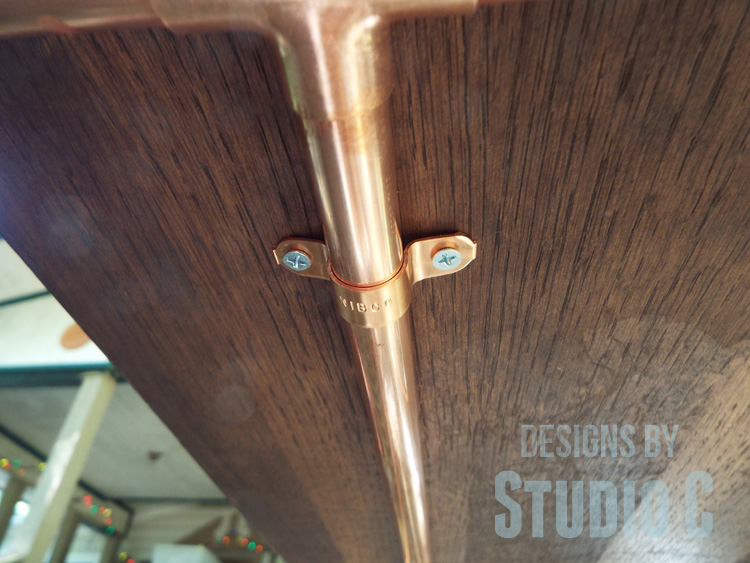
Measure for the shelves, and cut the plywood pieces to fit. Finish the plywood as desired. I used a dark brown stain with the white glue resist technique to create a subtle design.
Buff the copper with the steel wool to remove any lettering or discolorations. Secure the shelves to the shelf supports using the copper pipe straps and 3/4″ screws. Two straps on each support will be plenty secure!
Step Eight
Insert the caster legs into the tees on the bottom of the cart then insert the casters into the sleeves.
That’s it – the perfect piece to use for entertaining or as a decorative piece in the home!
The cart can also be built with PVC pipe then spray painted any color desired. Have any questions about the DIY copper pipe bar cart with wood shelves? Leave a comment below!
Originally posted 2016-10-10 08:00:24.
[…] A few copper fitting and plywood become a fabulous piece to use for entertaining – DIY copper pipe bar cart with wood shelves. […]
What is the final dimensions of the cart? thanks!
The cart is roughly 26″ x 17″ x 30″. I no longer have the cart and cannot give exact dimensions (though I should have before!)… Hope this helps!
How much did this project cost?
[…] sling is a super easy project! I’ve used the pipe to make a base for a table as well as a fabulous bar cart! Have questions about this project? Leave a comment […]